Having a chainsaw in your power tool inventory is a great way to make short work of any lumber based or tree landscaping projects. And with minor preventative maintenance, your chainsaw will last for years to come. One DIY maintenance procedure that you can easily accomplish and see immediate results is to sharpen the chain. This will make the cuts cleaner, the engine will run easier, and can be the difference in making a difficult job an easy one.
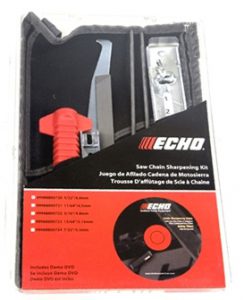
ECHO Sharpening Kit
ECHO has created all-inclusive  chain saw sharpening kits to make this procedure quick and easy. Correctly using this complete kit will improve performance, comfort, safety, fuel consumption, and saw component wear.
You’ll know when it’s time to sharpen your chain by observing the following indicators:
● Dull teeth along the chain
● Wood chips are small and dusty
● The pressure required to make a cut increases
● The engine races
If you’ve noticed any or all of these symptoms while using your chainsaw, follow the below guide to properly sharpen your chain to like-new sharpness.
1. To begin, first remove the oil on the guide bar by making a final cut on a log while stopping the chainsaw in the wood. You can also wipe down the bar with a rag while the chainsaw is not in use. And be sure to wear protective gloves throughout this sharpening procedure. Place the chainsaw on a flat, even surface and lock the guide bar in a vice. Make sure the chain is properly tightened and engage the chain brake.
2. Next, take out the file guide and insert it into the file handle. Insert the file into the file guide and tighten the wingnuts. Begin by sharpening the shortest or dullest cutter. The cutting angle can vary anywhere from 25-30 degrees depending on the type of chain. To identify which angle you should aim for, consult the instruction chart included with your filing kit. Adjust the angle using the wings of the handle or the markings on the file guide. Be sure to keep the file guide in contact with the cutter and depth gauge at all times, maintaining the lateral angle and grinding angle. And always sharpen each cutter from the inside of the cutter, to the outside, sharpening each to the same length to ensure smooth, even cutting.
3. If you’re using a file handle to determine the cutting angle, adjust the handle position to produce the right cutting angle before sharpening the cutters on the opposite side. You’ll know your cutter is correctly sharpened by the sharp, distinct cutting angles and no “flash” or “burrs” along each tooth. Keeping your chainsaw well sharpened with cutters that are even in length and at the proper cutting angle will increase performance, comfort, and safety.
4. The depth gauges on the chain determine the cutting depth. We recommend adjusting these depth gauges after 3 or 4 sharpenings. The gauge tool included in the kit will allow you to set all the depth gauges to the same level of .025 inches or .6 millimeters. It’s important to set the gauge tool on the cutters as you sharpen. Lower the part of the depth gauge that protrudes beyond the gauge tool, filing from the inside out then tilting the gauge tool to round off the depth gauge while protecting the cutter. Then repeat the procedure on the opposite side.
5. The guide bar should be cleaned and service regularly. The bar groove cleaner makes it easier to remove sawdust which can impair chain lubrication from oil holes and from the bar groove. The bar groove cleaner and flat file are included in the sharpening kit to make this kit a complete servicing kit for your chainsaw.
Before you know it, your chainsaw will cut like it was brand new. Be sure to keep an eye on the chain after every use to make sure you’re working with a well sharpened piece of equipment. You’ll notice a difference in the smoothness of each cut and with the amount of force you’ll need to exert while using the chainsaw. This will make your work easier as well as safer, reducing kickback and bucking from dull cutters getting “caught” in the wood.
Source: The ECHO Edge Blog


